
How to Stake ETH (Ethereum)
Learn how to stake your ETH with Blockdaemon in this step-by-step guide..
For institutional staking, we recommend using our multi-chain staking API, which includes Ethereum integration and reporting. The Staking API decreases the time it takes to receive staking rewards, cuts costs, eliminates errors, and accelerates your customers’ staking speed-to-market.
If you plan to stake without our API, the process of launching an ETH validator for staking assisted by Blockdaemon is also straightforward. This document and its appendices detail the process involved.
To stake your ETH with Blockdaemon, submit your details here.
Learn how to stake with Ethereum by following the steps mentioned below.
Note!
- As a Blockdaemon Customer, you will only be responsible for steps 1, 2 and 5 of this process.
- We highly recommend testing these validator setup steps on the Goerli/Prater testnet prior to using assets with real value!
- We recommend Fireblocks for institutions that are looking for custody options.
Step 1 – Set Up a Withdrawal Address
Blockdaemon will need the public address of an Ethereum account that will hold the necessary ETH and fund your validator(s).
We recommend using a custodian that supports ETH2 staking actions or a hardware wallet, such as a Ledger. We do not recommend using a software wallet.
Once your validator exits the protocol, your 32 ETH collateral will be returned to this withdrawal address. After withdrawals have been enabled with the Shanghai hard fork, protocol rewards will also be pushed to this address.
The same address will also be set as your fee recipient address, to receive the transaction fees and MEV rewards from blocks created by your validator.
Note!
- Blockdaemon never has access to any funds on the withdrawal address.
- Validators are staked in increments of 32 ETH.
- For two validators you would need 64 ETH; for 3 validators you require 96 ETH, and so on.
- They can and usually do share the same withdrawal address, but it also makes it possible for external parties to link the validators.
- Ethereum 2 (BLS) addresses are not supported anymore, as after the Shanghai fork these cannot receive protocol rewards or collateral after exiting a validator.
Step 2 – Share Your Public Address with Blockdaemon
You (or your custodian) share your withdrawal address (mentioned above) with Blockdaemon.
You (or your custodian) indicate the number of validators you would like Blockdaemon to set up.
Note!
- Never share any private keys.
- If there are any errors (incomplete keys, etc…), we will respond so you know what is missing or appears to be incorrect.
Step 3 – Blockdaemon Launches Your Public Validator(s)
You will not need to perform any tasks in this section. However, for transparency, we will detail the steps so that you know what actions are taken.
Blockdaemon will acknowledge receipt of this information and schedule the set-up of your validator(s). Blockdaemon will then generate the validating keys for the desired amount of validators and begin launching the validators.
Blockdaemon has optimized for launching large amounts of validators on-demand, so these steps are automated where appropriate:
- Blockdaemon creates a BLS12-381 private key and generates addresses conformant to EIP2333and EIP 2334.
- These are Validating Keys. These keys cannot spend any funds on the validator. This key is used to sign blocks for validating and will be used to trigger an exit from staking.
- Blockdaemon uses the Validating Keys to generate the data that will be needed to generate the transaction to fund these validators:
- pubkey – The public key of the created validator.
- withdrawal_credentials – A SHA256 hash of the withdrawal address (which you or your custodian created) with the first byte replaced with 0x00.
- signature – A signature by pubkey to prove this key exists.
- deposit_data_root – A Merkle root of the other fields to ensure they were generated correctly.
- At this point, Blockdaemon will return the data to you for you to craft the Ethereum 1 transaction to fund your validator.
Step 4 – Blockdaemon Provides You With Transaction Data
For each withdrawal key shared with us, we will share the four data points exposed in the previous section; pubkey, withdrawal_credentials, signature, and deposit_data_root.
- As an individual user self-custody, we will arrange for the transaction data to be shared with you in your preferred manner.
- By default, Blockdaemon generates JSON responses containing this data. This can then be adapted as required.
- If you are using a custodian or wallet with Blockdaemon integration, our team will upload the deposit data through the custodian’s API. You can then sign there.
Step 5 – Fund Your Validator(s) with an Ethereum Transaction
For each validator, you will need to send 32 Ether from the Ethereum blockchain to the deposit contract address to fund the validator. These funds can originate from a different address from the withdrawal address.
Your transaction will call the deposit function on the Ethereum 2 deposit contract. This contract resides on the Ethereum blockchain at: 0x00000000219ab540356cBB839Cbe05303d7705Fa
- As an individual self-custody user, you will need to create an Ethereum transaction to fund the validator. For detailed instructions on how to manually create transactions, a step-by-step guide using MetaMask is provided below. Though this is illustrative of what goes into a transaction and how one might create one, we definitely recommend using automated workflows to fund validators if you have a large number of validators to launch.
- This process may be handled for you automatically by a custodian if you are using one, in which case you may not have any further steps to complete. Please refer to any documentation they provide, as this will involve sending (multiples of) 32 ETH from your Ethereum account to fund the validator and enter it into the queue for staking.
Note!
- You do not need a unique address to fund each validator. A single address is enough, providing it holds sufficient ETH, but it also makes it possible for external parties to link the validators.
- If you have a large number of validators to launch, we recommend using custodian automated workflows to fund your validators. Or use our staking API, which can bundle the launch of up to 100 validators into one transaction, making staking much more convenient and saving you gas costs.
Step 6 – Your Validators will Join the Activation Queue
All actions you need to take have now been completed.
- The Ethereum transaction will need to be 2048 blocks deep (approximately 8 hours in real-time) on the Ethereum blockchain, at which time the beacon chain/consensus layer will add your data to the validator directory.
- The validator will then enter the activation queue to begin staking. The activation queue time may vary.
Optionally recommended: Add your validator addresses to the Blockdaemon web application at https://app.blockdaemon.com/signin. Here you’ll be able to easily manage the performance of your thousands of individual validators and see portfolio-level overviews. It also includes a dedicated ETH Staking Dashboard:
- See portfolio balance by principal and reward amounts.
- Gain insight into the status and reward details of your individual validators
- Want to reconcile your staking rewards with your traditional accounting system? No problem, easily download the reward history of all your validators as a .csv file.
Deposit Contract Steps with Etherscan
Note: We recommend Fireblocks for institutions that are looking for custody options.
Requirements
- Access to Metamask with Ethereum 1.0 account on Mainnet with funds (32 per validator plus gas fees).
- Helper JSON file (provided by Blockdaemon).
- Raw deposit data file, if you want to verify the transaction (provided by Blockdaemon).
Preparation
Before you continue, it is highly recommended that you have your MetaMask unlocked and ensure that you are using the correct Ethereum account on Mainnet.
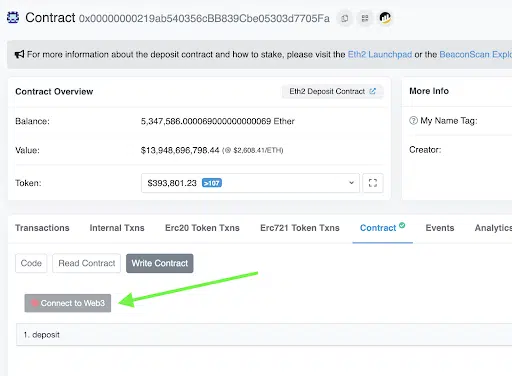
Visit the smart contract on Etherscan
For the following steps, all customers can use the same Smart Contract on Etherscan to deposit their 32 ETH:
0x00000000219ab540356cBB839Cbe05303d7705Fa
Connect MetaMask with Etherscan
While viewing the contract on Etherscan, perform the following to connect MetaMask:
- Click on the Contract tab.
- Click on the Write Contract button.
- Click the Connect to Web3 button.
- Select MetaMask from the modal.
- Select the Ethereum 1 address with the funds.
- Confirm by clicking on the Connect button.
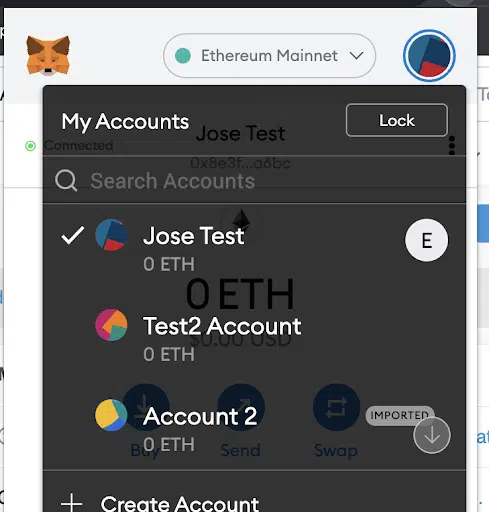
Verify MetaMask is connected with Etherscan
- Open MetaMask plugin.
- Click on your account icon.
- The modal should show an E icon next to the connected account:
- Click the Connect to Web3 button on Etherscan, select MetaMask from the modal, and click OK on the next modal.
- The button should turn green and should show the contract address.

Deposit the 32 Eth
- Below the Connect to Web3 button, click the deposit button; this will expand the form.
- Enter 32 as the Eth amount you want to deposit.
- Then use the deposit data file to fill in the rest of the form.
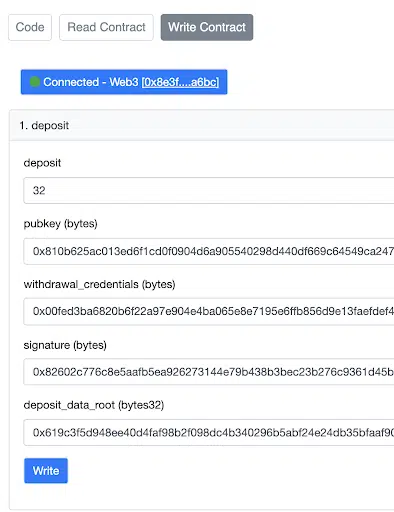
- After all the fields are filled, click the Write button.
- MetaMask will load the transaction information in the modal; the user can review the tx.
- Optional: user can go to the Data tab and verify the Hex Data with the 2nd tx file provided by Blockdaemon.
- Click Confirm; the deposit has been completed.
Verify Validator Address
Go to Eth2 Beacon explorer and search for the validator public key, they should have the Deposited icon with a green checkmark and should be pending approval.
Notify Blockdaemon and Sign In to the App
Once you have verified your validator is pending, alert your Blockdaemon Technical Account Manager (formerly known as Relationship Manager).
To further help you manage your ETH Staking portfolio, add your validator addresses to the ETH Staking Dashboard found at app.blockdaemon.com/signin.
Interested in running your own Ethereum Validator? Send us a message to get started.
Updated 4 months ago